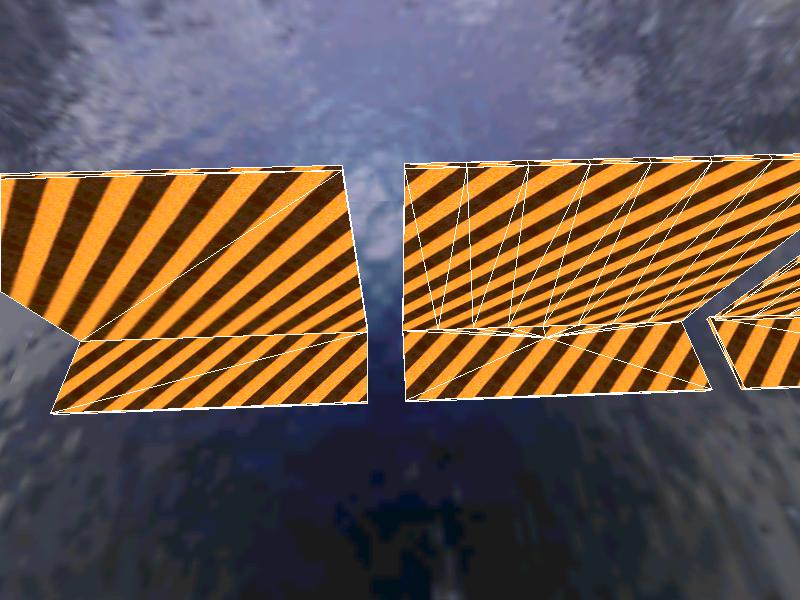
r_speeds in IdTech3
Original by claudec 2000
r_speed Basics
r_speeds are a set of numbers that allow the level designers to estimate the load on the game engine. The main number of concern is the polygon count. This number represents the number of polygons the game engine is rendering.
When you look at the image on your screen, you see one picture. However the game engine is really displaying a bunch of polygons (triangles). Upon those triangles the picture you see is drawn. Level designers sometimes talk in terms of how much the game "sees". What they mean is how many of these polygons the game engine is rendering.
Be sure to run map with devmap command to enable cheats or r_speeds won't turn on. When you type /r_speeds 1 in the game console it will start to display a set of numbers.
What r_speeds tells us:
- The number of unique shaders being loaded.
- The number of unique surfaces being loaded.
- The amount of leaf node branches to current leaf volume.
- Combined vertex count drawn (seperate polygons can share vertices).
- Total visible polygon which are drawn.
- Total visible polygon which aren't drawn.
- The number of dynamically lit surfaces.
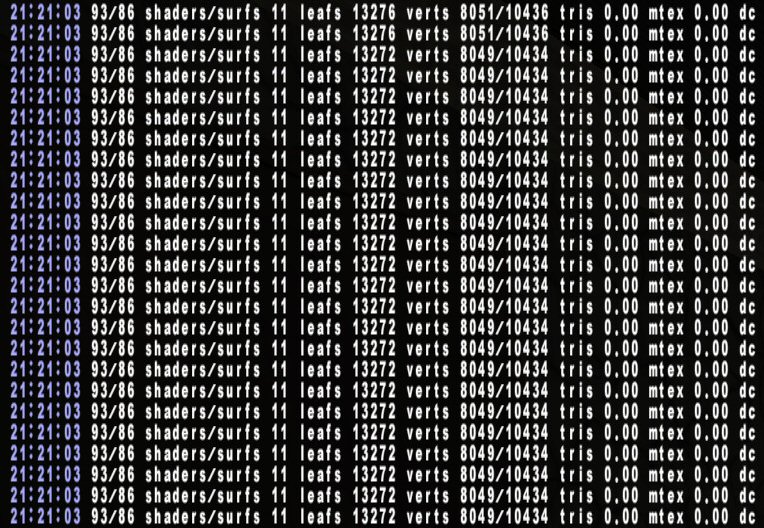
The important one is the rightmost of the two a little right of the center labeled tris.

It is important to keep that number below 10,000 to 12,000 in your absolute worst view. The key phrase here is worst view. That does not mean it should be on average 10,000 to 12,000. That means in the spots where it is highest it should absolutely not be over 12,000 and preferably not over 10,000.
I would shoot for 8,000 or less in most areas to be on the safe side. i.e in general try to keep it at or below 8,000. That way when you hit an area where it goes over 8,000, it will hopefully not go over 12,000 and preferably it will stay below 10,000.
You should check you r_speeds in every area. Not just from the center of the area but from the corners and/or furthest extents of the area as well. For example if you have a square room, then you would want to check r_speeds from the corners looking inward as well from the center area of the room.
r_speeds And Vis
Now this part is a little tricky. The game engine sees more than what you see on
the screen. For instance you could be seeing a wall with a window in it and a small
part of a room through that window. However the game engine may actually see the whole room.
What the game engine does, is it draws the stuff farthest away first. Then it draws the stuff
that is closer and the closer stuff covers up the further away stuff. So given our example the
game engine draws the whole room then draws the wall with the window in it. The wall covers the
room except where the window is.
The end result is that you only see part of the room through
the window yet the game engine does the work of rendering the entire room.
When you compile a level, three processes occur. BSP, VIS and RAD. BSP makes the structure i.e. the walls, floors, columns ETC. VIS creates a table that tells the game engine what can be seen from any given point in the game. RAD does the lighting. VIS is the one that affects r_speeds
There are two options for VIS we are concerned with here. Fast and full. Fast can be specified in Q3Radiant and in the front ends used for compiling. When fast is not specified then a full VIS occurs.
You must do a full VIS in order for the r_speed numbers to be accurate. This is because fast VIS
does less efficient calculations than full VIS. This results in the game engine being able to see a
lot more with fast VIS than with full VIS. Things like doughnut VIS blockers
( you can learn about those if you read the docs listed at the end of this tutorial) don't work with fast VIS.
So always use full VIS to test r_speeds and for the final release of a level. There may be an
exception involving space maps or maps where all areas are visible from everywhere.
In this case
there may not be much difference in r_speeds between fast and full VIS, so one might want to use
fast vis to reduce the exceptionally long compile times of such maps.
I have not experimented or read
much about it so I will only mention that such a technique exists so the reader may research or
experiment with it if they please.
Turning on r_speeds And Other r_speed Related Commands
When typing commands in Quake III you need to precede the command with a forward slash "/".
r_speeds and other useful commands are cheat protected so you must run your map with cheats enabled. This can be done by running map with devmap command ex. /devmap mymap
To turn on r_speeds type /r_speeds 1 to turn them off type /r_speeds 0.
noclip - This allows you to fly around and go through walls. Nice for checking r_speeds from high spots to see how it will be if someone grapples up there. And good for getting around level quickly.
These are my development keys. You have to be in devmap mode to use them.
bind F5 "toggle r_showtris"
bind F6 "toggle r_lockpvs"
bind F7 "toggle r_speeds"
r_lockpvs locks your point of view in place so you can wander your map and see what is seen and not seen from that point of view (with fastsky on the not-seen will be yellow)
r_showtris is showing you EXACTLY how the world is being broken into triangles.
This is your diagnostic for looking for problems caused by brushes.
r_speeds, Shaders And Curves
Shaders with mutliple map definitions, transparencies and curves all have a significant effect on the load the game engine has to handle.
There is at least an attempt to incorporate the effects of mutlipass shaders in the r_speeds.
"The counts in Quake 3 take into account the geometry, but also add in the multipass
texture rendering and dynamic level of detail on curves." - Paul Jaquays
You can tell which shaders have multiple textures by looking at the shader. Each time you see a section that has a map command at the beginning like map textures/sfx/cabletest2.tga that is a map definition. The more map definitions the more it will tax the game engine. Standard lightmap + texture shaders have only two map definitions and the first one looks like this:
{
map $lightmap
rgbGen identity
}
Referring to an Interview with Paul Jaquays in 2000
We can see from the following 2 questions that shaders with multiple map definitions will tax the game engine
quite a bit and that transparencies are very taxing. Also the complexity of the curve counts
in all this.
How much does the multipass stuff like fog, etc. affect the poly count?
Significantly. Generally speaking, all textures drawn in the world require a
minimum of two redraw passes. Every time you add a stage of manipulation to
a texture, you must redraw the world (or at least that part of it),
essentially adding the number the polies containing that texture to the
total poly count.
If you can see a polygon through another polygon, as is
the case with many of the alpha channel functions (transparencies,
translucencies, cutouts, decals) and special cases like water and fog,
you add the count for the texture that you are seeing through to the textures
you can see.
Think of it as stacking up layers. Each pass on a texture is a
layer. Each pass on a texture you are looking through is a layer added to
the stack. Each layer requires a redraw pass of the world.
How bad do curved surfaces hurt poly counts?
The more complex the curve, the more triangles are needed to define it. A simple beveled edge (in carpentry terms, that would be a quarter-round moulding) is probably the cheapest.
Bending curves into complex configurations adds up polies fast. Close up, they are triangle intensive. At distances, the dynamic LOD brings the counts down some (which doesn't occur with rectilinear geometry).
I guess the best advice here is, balance the level of detail, use of shaders, size of area (as seen by game engine), the amount and complexity of curves. If you are go to be big in one of them then go small in the others. For instance if you are making a big area, then keep the number of details like steps, light fixtures ledges, outcroppings, trim pieces to a minimum also keep curves simple and to a minimum and stay away from shaders with a lot of texture passes. It would NOT be a good idea to have a large area and also have a bunch of shaders with electric sparks and other effects all over the place.
Or if you wanted a high level of detail then make your areas small and VIS block between those small areas. Also keep the use of shaders with multiple map definitions down. And if you want a lot of shaders with fancy effects, transparencies, multiple map definitions, warping etc. Then keep it to a small area and keep the level of detail toned down a bit. i.e ramps instead of stairs, fewer light fixtures etc.
The key word in all this is balance. If you keep these factors in balance then you can make a cool looking and playable level. If the balance gets out of whack then you may end up with a level that lags out the player. In which case it doesn't really matter how cool looking it is.
r_speeds From Quake II to Quake III
In Quake III the entities are compiled into the bsp file. So now we don't have to deal with balancing Epoly with Wpoly as we did in Quake II. However many of the tricks that helped to reduce r_speeds in Quake II also work in Quake III. So the use of VIS blockers, Mitered corners etc still work.
You no longer need to worry about bsp cutting brushes up when they
touch. This means that keeping brushes one unit away from each other is a trick that is no longer necessary.
It also means that unlike Q2 the lower poly option is to place things like light fixtures on walls and
ceilings rather than insetting them. This is the opposite of the way it is in Q2.
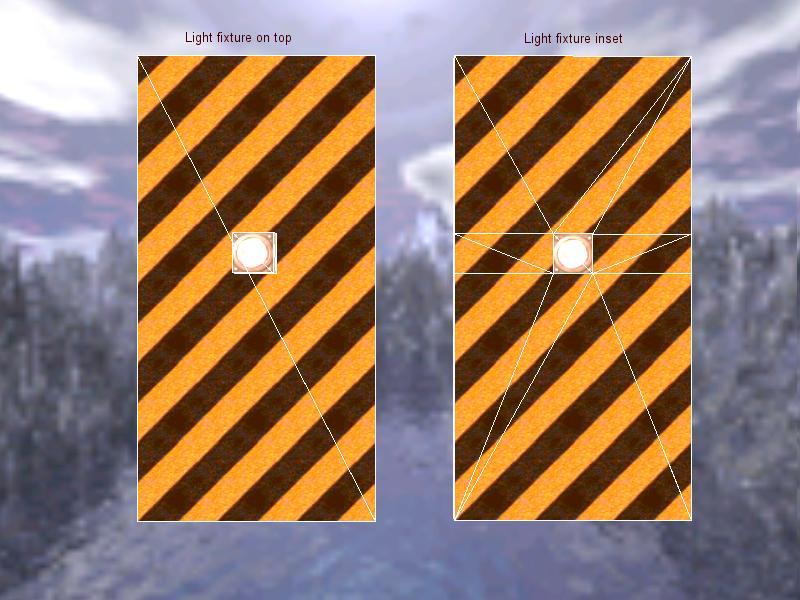
The brush on the left has the light fixture on top. The brush on the right has the light fixture inset. Notice how much more the brush is broken up when the light is inset. I count twelve triangles on the brush with the inset light. While the one with the fixture on top only has two.
Be forewarned it does not always work that way. If the brushes touch at the edges it can cause
them to break up.
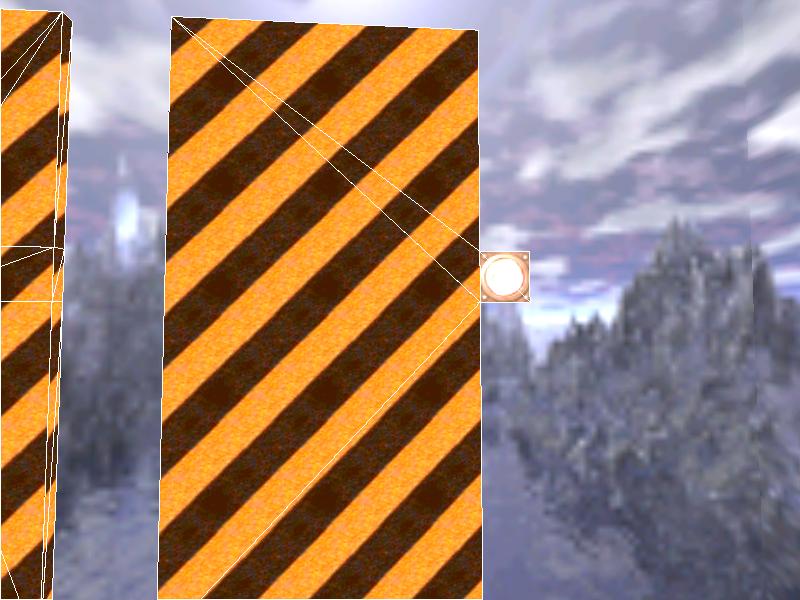
Notice how the wall brush is broken up into four triangles when the light fixture touches it
at the edges. This means that walls can cause floor brushes to break up.
In this screenshot the wall on the left is made from one brush.
The wall on the right is made from eight brushes. Notice how the floor is broken up by the eight brush wall.